News Center
The correct installation of high efficiency filter graphic reference
2025/2/7
01 Make preparations before installation
In order to prevent the high efficiency filter from being polluted, the unpacking inspection and installation must be carried out after the installation of the air cleaning system, the air conditioner, the high efficiency filter box, the air duct and the clean room are cleaned, and the dust amount blown out of the air conditioning system is stable after the test run of each unit equipment and the air duct.
Before installation, check the flatness of the filter frame or the end face, and the allowable deviation of the end face flatness should not be greater than 1mm each. If the flatness of the end face exceeds the allowable deviation, only the end face of the filter is allowed to be modified or adjusted, and the outer frame of the filter itself is not allowed to be modified, otherwise it will damage the filter material or the sealing part of the filter and reduce the filtering effect.
02 Installation Requirements
When installing the high efficiency filter, ensure that the direction of the air flow is consistent with the direction of the arrow mark on the outer frame. When the high efficiency filter assembled with corrugated plate is installed vertically, the corrugated plate must be vertical to the ground and not reverse.
The high efficiency filter and the assembly of the high efficiency filter frame, the seal generally adopts the top tightening method and the pressing method. For more than 5 level cleaning systems with strict cleanliness requirements, some use knife rack type high efficiency filter liquid tank sealing device.
1) Installation of jacking method and pressing method The jacking method can install and replace high efficiency filters in a dust-free workshop. Figure 10-35 shows the installation method. The high efficiency filter can be installed and replaced only in the suspended ceiling or technical sandwich. Figure 10-36 shows the installation method.
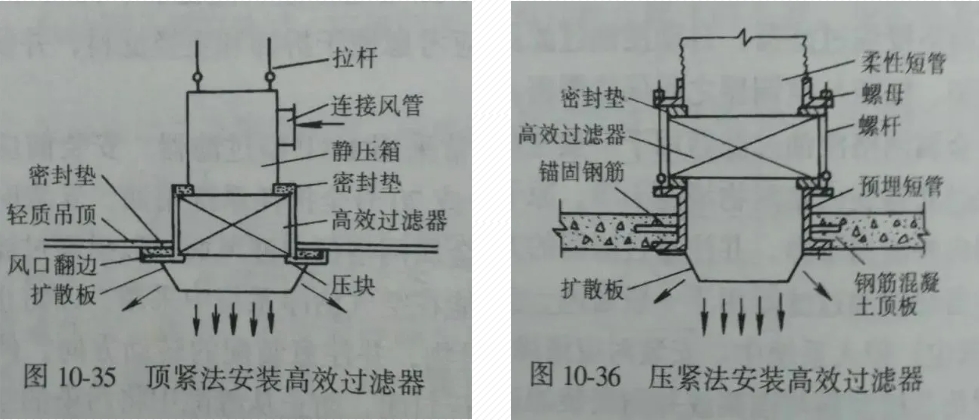
The seal of the filter and the frame is generally made of closed-cell sponge rubber plate or neoprene rubber plate, and silicone rubber is also applied to seal. The thickness of the gasket is usually 6~8mm, which is positioned and pasted on the filter frame, and the compression rate after installation should be 25%~30%. The sealing gasket splicing method is the same as the flanged gasket splicing method of the air cleaning system air pipe, that is, the trapezoidal or vertebral splicing method is used.
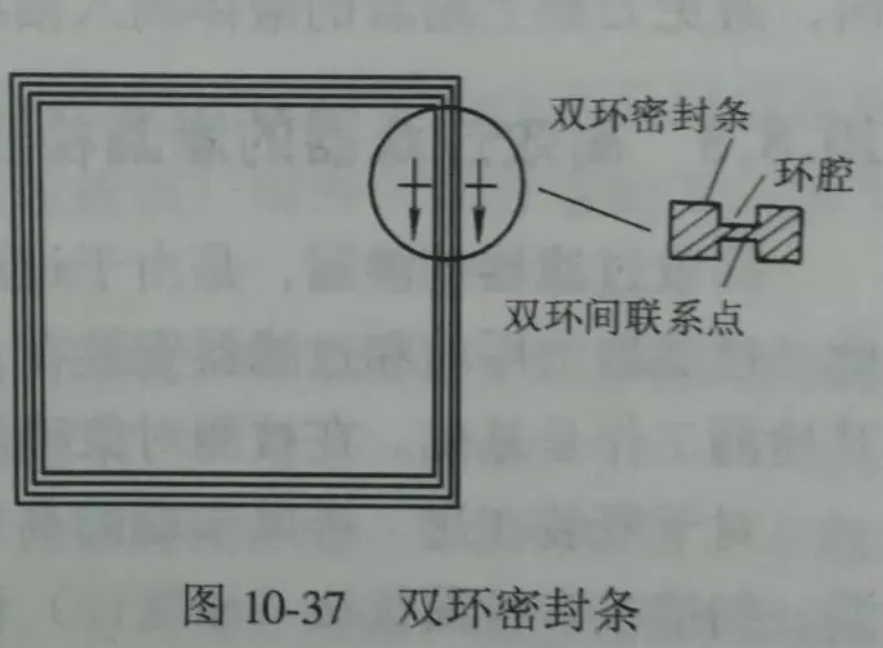
When the filter and the frame are sealed with a double ring seal, do not block the holes on the ring cavity. Double ring seal and negative pressure seal must keep the negative pressure pipe unblocked. Figure 10-37 shows the double ring seal.
Filter and frame seal, such as the use of silicone rubber as a sealing material, in order to ensure good sealing, before applying silicone rubber, should first clean the filter and frame on the debris and oil, and then full evenly applied silicone rubber.
2) Liquid tank seal installation Liquid tank seal method is to improve the cleanliness of the dust-free workshop and the development of a sealing method, it overcomes the pressing method due to the poor flatness of the frame end face, so that the filter seal is not tight or the sealing gasket aging leakage and replacement disassembly cycle is longer.
The liquid tank sealing device consists of two -, three -, and four-way groove connectors pressed by aluminum alloy plates and connected by screws, as shown in Figure 10-38.
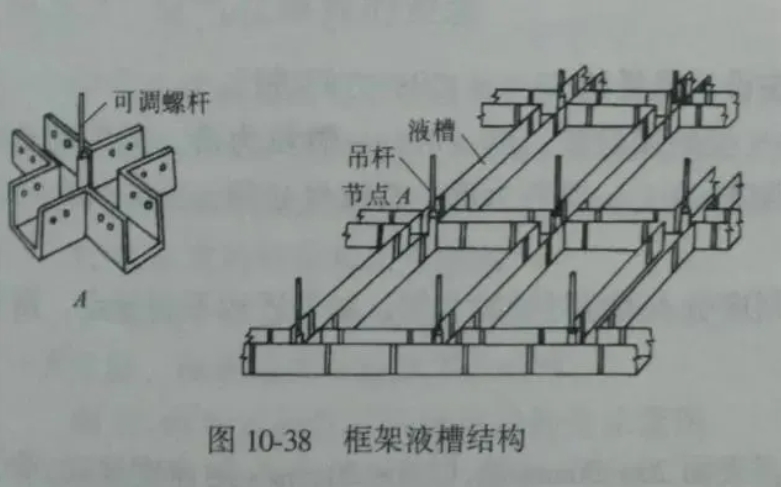
Figure 10-39 shows the installation form
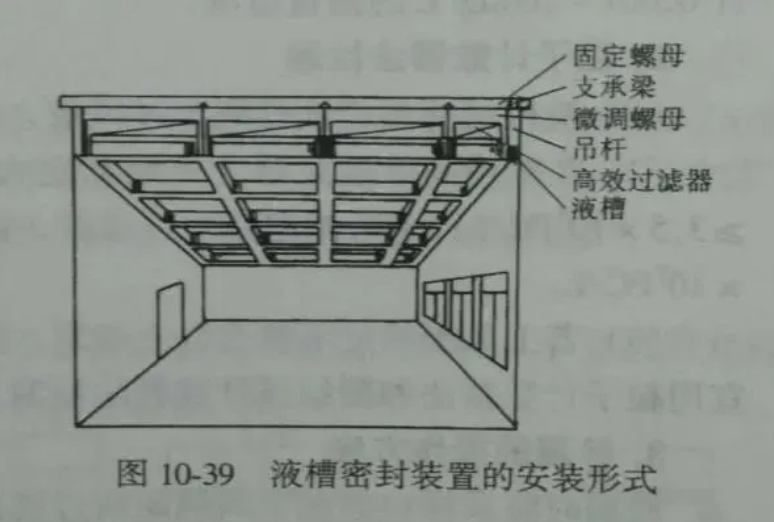
After the frame tank is connected, apply silicone rubber or epoxy resin adhesive and other sealants to seal all joint gaps. Then, after the sealing liquid is heated in a water bath to about 80C, it is quickly injected into the tank to reach the design depth. After the sealing liquid is cooled, the high efficiency filter can be installed. When installing the filter, the tool holder should avoid contacting the groove wall to avoid forming a leakage boundary; The tool holder should be gently inserted into the liquid tank to seal. The general operator should put the filter on the frame from above, or according to the shape and size of the filter, put the filter diagonally through the liquid tank from below and then align it.
If the installed filter needs to be moved, lift the filter up, and then gently lower it into the slot. Do not push the installed filter hard to avoid liquid overflow or damage to the filter. When replacing the filter, the support plate should be prepared in advance. When the filter tool holder is removed from the liquid tank, the support plate should be placed under the filter immediately to avoid the liquid attached to the tool holder dripping into the dust-free workshop or polluting the installed filter.


